When an update is released, follow one of these two listed Update Methods to download the new version to your computer and upload it to your Mortty Keyer.
Download Mortty v5 Firmware Release
- 2024-03-26: Mortty v5 firmware release #1 (RTTY fix), click Mortty_firmware_v5r1_1.zip
- 2024-03-15: Mortty v5 firmware release #1
- 2024-02-01: Mortty v5 firmware release #0, click Mortty_firmware_v5r0.zip
This Mortty_v5_BLINK program tests the hardware features of the Mortty keyer: nine LEDs, speed pot, sidetone speaker and volume control, CW<->RTTY switch, Radio 1 & 2 outputs, and CW Paddle input. See the README.txt file for instructions
- Mortty v5 test program. Unzip and README.txt. Click Mortty_BlinkTone_v1.zip
Mortty Release Level: What Firmware Release is Running in Your Mortty Keyer?
- The following procedure displays the firmware release of Mortty
- Unplug the USB cable from your Mortty keyer, while keeping the other end of the cable plugged into your computer
- Turn Mortty’s CW Speed control fully counter-clockwise (MINIMUM)
- Plug the USB cable into the Mortty keyer. The rear-panel Power (blue) LED should light immediately and remain lit as long as the USB cable is connected to a power source (PC)
- Observe the rear-panel CW (green) and RTTY (yellow) LEDs
- If the rear-panel CW (green) and RTTY (yellow) LEDs never blink in unison (both lit at the same time), Mortty is at firmware release 0
- If the rear-panel CW (green) and RTTY (yellow) LEDs blink in unison (both lit at the same time), the number of in-unison blinks equates to the firmware release number. For example, two blinks equals firmware release #2
- After the firmware blinks, the selected Mortty mode will launch based on the position of the CW<->RTTY switch. One LED – CW (green) or RTTY (yellow) -will light and remain lit. Do not count the lighting of the single LED (CW or RTTY) as a firmware release “blink.” The keyer is now operating normally and waiting for instructions from a logging program.


Update Method #1: Easy – No Disassembly Required
- NOTE: This Update Method applies to firmware release #1 and greater. If your Mortty keyer is at firmware release #0 you must use Update Method #2
- Navigate to the mortty.net website and download the latest version by clicking on the download link on the >Update page.
- Open Windows Explorer. Navigate to the folder with that downloaded file
- Unzip the downloaded file to its executable filename Mortty_firmware_v5r#.uf2
- Unplug the USB cable from your Mortty keyer, while keeping the other end of the cable plugged into your computer
- Turn Mortty’s CW Speed control fully clockwise (MAXIMUM)
- Plug the USB cable into the Mortty keyer
- Observe that the rear-panel CW (green) and RTTY (yellow) LEDs are flashing rapidly
- Within five seconds, quickly turn Mortty’s CW Speed control fully counter-clockwise (MINIMUM)
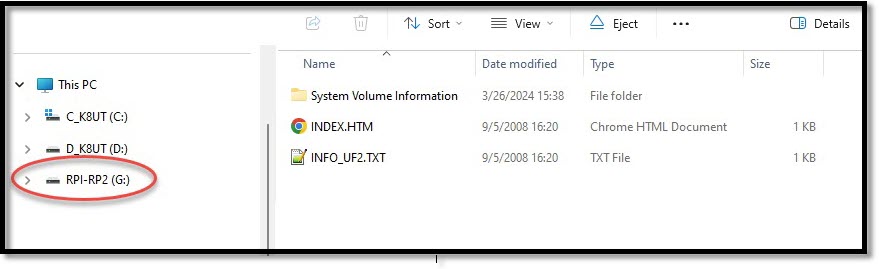
- You should hear a Windows “beep” after turning the CW Speed pot fully counter-clockwise. Windows may open a new File Explorer window showing Mortty as a file store. But if a window does not open automatically, manually open a File Explorer window. Navigate to the Mortty filestore which you will see listed in Explorer’s This PC column as RPI-RP2. (see screenshot below)
- Copy&Paste or Drag&Drop the executable .uf2 file from Explorer’s step #4 download location to the second Explorer’s step #10 Mortty filestore
- When the upload is complete: Windows “beeps”, the second Explorer window closes, Mortty v5 launches automatically

Update Method #2: Less Easy – Disassembly Required
- Disassemble Mortty
- Unplug ALL cables from Mortty – USB, Radios and Paddles
- Remove Mortty’s CW speed knob, front & rear panels
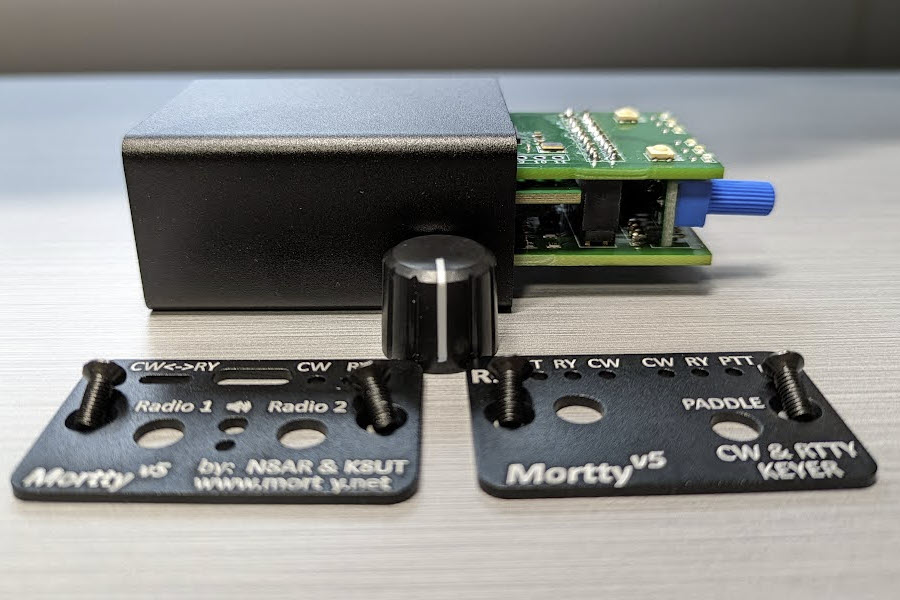
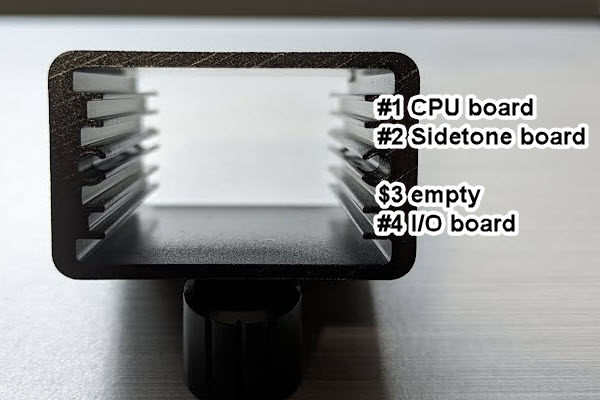
- Note the case’s four interior guides that restrain Mortty’s 3 circuit boards: #1 CPU board, #2 Sidetone board, #4 I/O board (#3 is vacant)
- As a group, gently push all three circuit boards from the case. Do not separate them from each other
- Close any logging and/or digital program that accesses Mortty’s USB port
- Navigate to the mortty.net website and download the latest version by clicking on the download link on the >Update page.
- Open Windows Explorer. Navigate to the folder with that downloaded file
- Unzip the downloaded file to its executable filename Mortty_firmware_v5r#.uf2
- Check that the USB cable is still plugged into your computer
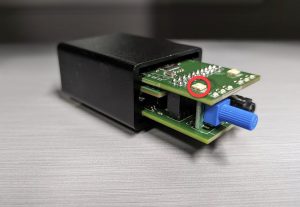
- Locate the white BOOT button on Mortty’s top (“CPU”) circuit board (see image: red circle)
- Press and Hold the BOOT button while inserting the USB cable into Mortty
- Release the BOOT pushbotton after a Windows “beep”
- A second File Explorer window will open, showing Mortty as a filestore (see screenshot, above)
- Copy&Paste or Drag&Drop the unzipped .uf2 file from Explorer’s step #4 download location to the second File Explorer’s step #8 Mortty filestore
- When the upload is complete: Windows “beeps”, the second Explorer window closes, Mortty v5 launches automatically
- Unplug the USB cable from Mortty’s USB port
- Re-assemble Mortty
- Keeping the circuit boards nested together, gently slide them into their interior guides: #1 CPU board, #2 Sidetone board, #4 I/O board (#3 is vacant). See photo
- It’s a tight fit! Requires slight manipulation of each circuit board
- Re-assemble end panels and speed pot knob. The end panel screws should thread effortlessly into the case, but can become cross-threaded. If they become hard-to-turn, back off and start over.
- Rear panel component slots for the USB, Radio 1 and Radio 2 jacks are precisely aligned. You must adjust the rear panel to ensure that all three jacks extend into their respective slots before tightening the screws. It’s a little tricky – especially the USB jack!
- Re-connect Mortty’s USB, Output, and Paddle cables
- Mortty v5 launches automatically
- Done!